Steelcase cubicle assembly requires precision and attention to detail to ensure stability and functionality. Proper assembly guarantees a durable, ergonomic workspace, essential for modern office environments.
Overview of Steelcase Cubicles
Steelcase cubicles are renowned for their modular design, durability, and adaptability, offering a versatile solution for modern office spaces. Built with high-quality materials such as steel, fabric, and nylon, these cubicles are designed to enhance workplace efficiency and employee satisfaction. They feature customizable panels, ergonomic accessories, and integrated cable management systems, ensuring a clutter-free and organized workspace. Steelcase cubicles are ideal for creating private yet collaborative environments, catering to diverse office layouts and workflows. Their sleek, professional aesthetic aligns with contemporary office design trends, making them a preferred choice for businesses seeking long-term functionality and style.
Importance of Proper Assembly
Proper assembly of Steelcase cubicles is crucial to ensure structural integrity, safety, and functionality. Incorrect assembly can lead to unstable frames, misaligned panels, and potential safety hazards, compromising the overall durability of the cubicle. A well-assembled cubicle provides a stable and secure workspace, protecting valuable equipment and ensuring user comfort. Additionally, correct assembly adheres to manufacturer specifications, maintaining warranty validity and extending the product’s lifespan. Proper assembly also enhances aesthetic appeal, contributing to a professional office environment. By following detailed instructions and using appropriate tools, users can achieve a seamless and efficient setup, maximizing the benefits of their Steelcase cubicle investment and creating a productive workspace for years to come.
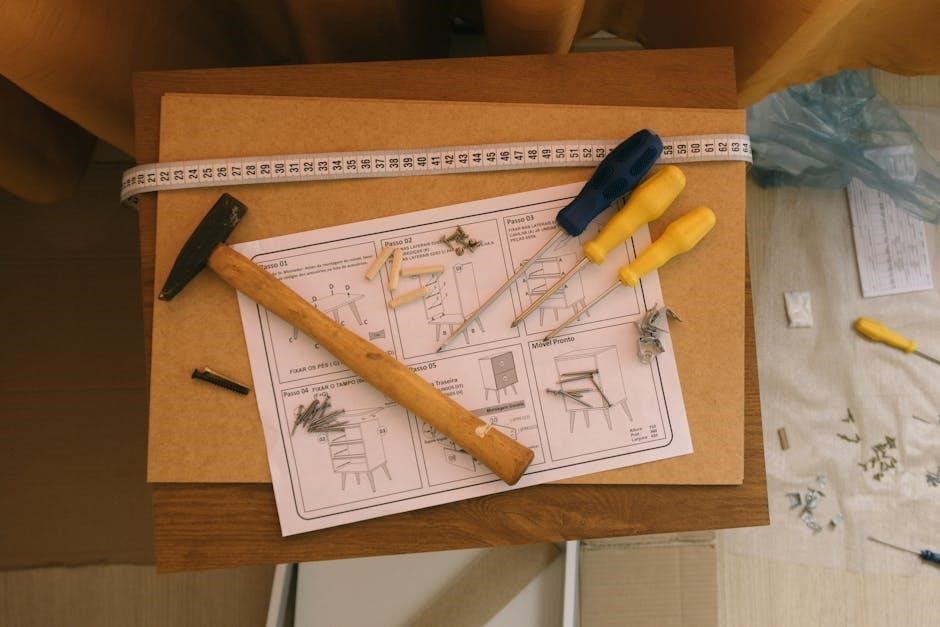
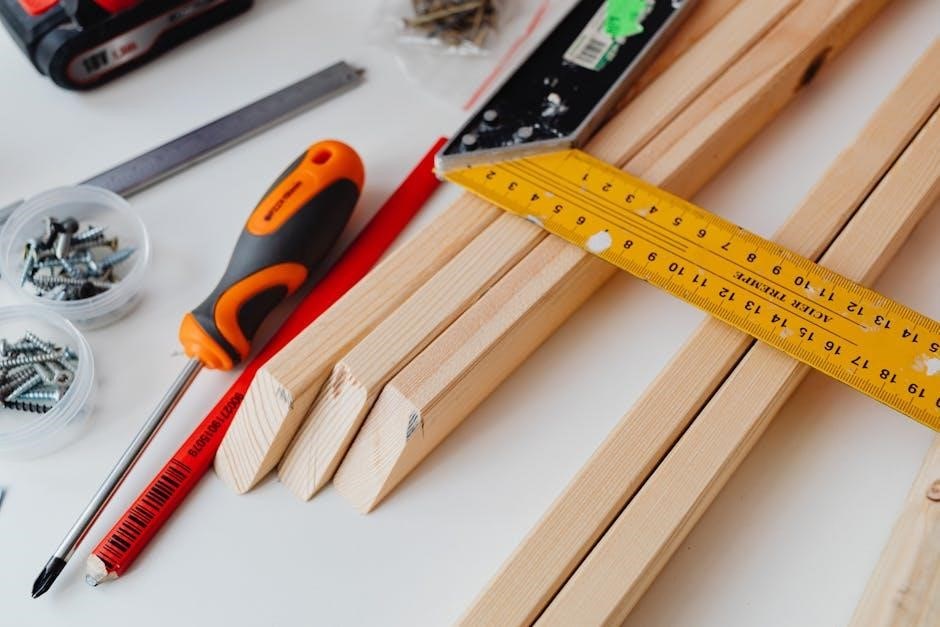
Tools and Materials Required
Assembling Steelcase cubicles requires specific tools and materials to ensure a smooth and successful process. Essential tools include an Allen wrench (3mm and 5mm), a screwdriver (both Phillips and flathead), and a rubber mallet for tapping parts into place. Additionally, a tape measure and clamps may be useful for alignment and stability. Materials needed include the cubicle components themselves, such as frames, panels, hardware (e.g., screws, bolts), and any custom features like cable management systems. Steelcase does not typically provide tools, so it’s important to have these ready beforehand. Proper organization of parts and labeling can also streamline the assembly process and reduce errors. Always refer to the provided instructions for specific requirements.
Pre-Assembly Preparation
Pre-assembly preparation involves unpacking and verifying all components, setting up a clean workspace, ensuring safety, and organizing tools and materials for efficient assembly.
Unpacking and Inventory of Components
Begin by carefully unpacking all components from their boxes, ensuring no damage occurred during shipping. Organize parts such as frames, panels, hardware, and tools. Use the provided inventory list to verify that all items are included and accounted for. Check for any visible damage or missing pieces and contact the supplier if issues arise. Lay out components in a logical order to streamline assembly. Tools like Allen wrenches and screwdrivers are essential, so ensure they are readily available. Refer to the assembly manual for specific instructions on identifying and grouping parts. Proper organization prevents delays and ensures a smooth assembly process. This step is crucial for efficiency and accuracy.
Workspace Setup and Safety Precautions
Before starting assembly, create a spacious, flat, and dry workspace to prevent damage to components. Clear the area of clutter and ensure good lighting for visibility. Wear protective gear like gloves and safety eyewear to avoid injuries. Gather all tools and materials, organizing them for easy access. Use a soft cloth or mat to protect fragile parts from scratches. Avoid wearing loose clothing that could get caught in tools or components. Double-check the instructions for specific safety recommendations. Ensure power tools are used correctly and keep them out of reach of children; Proper workspace setup and adherence to safety guidelines ensure a smooth and incident-free assembly process. This preparation is key to achieving professional results.

Step-by-Step Assembly Guide
Steelcase cubicle assembly involves a systematic approach, starting with frame installation, followed by panel attachment and hardware fitting. Use provided tools and ensure all parts are organized for efficiency.
Assembling the Frame and Base
Begin by carefully unpacking and organizing all frame and base components. Use the provided Allen wrench to secure the vertical posts to the floor plate, ensuring alignment with pre-drilled holes. Next, attach the horizontal crossbars to the vertical posts using the supplied screws. Tighten firmly but avoid overtightening, which may damage the threads. Once the frame is upright, connect the base panels to the vertical posts using the clips or brackets provided. Ensure all connections are snug and level. Double-check the alignment of each part before moving forward, as a stable frame is crucial for the entire structure. This step lays the foundation for the rest of the cubicle assembly, so precision is key.
Attaching Panels and Walls
Once the frame and base are secure, begin attaching the panels and walls. Start by unpacking the panels and corresponding brackets or clips. Align each panel with the designated slots on the frame, ensuring proper fitment. Use the provided screws or clips to fasten the panels to the vertical posts, tightening firmly but avoiding overtightening. Check the alignment with a level to ensure panels are straight and evenly spaced. For adjacent panels, connect them using the supplied joining hardware to create a seamless look. Repeat this process for all remaining panels, working methodically around the cubicle. Ensure all connections are stable and secure before moving on to the next step. Properly attached panels and walls provide the structural integrity and privacy needed for the workspace.
Installing Doors and Hardware
Begin by preparing the door frames and hardware components. Attach the hinges to the door panels, ensuring they align with the pre-drilled holes on the cubicle frame. Secure the hinges using the provided screws, tightening firmly. Next, install the door handles or pulls, aligning them with the door’s center for optimal functionality. Attach the latch mechanisms to the door and frame, ensuring proper alignment for smooth operation. Use a level to verify the door’s alignment with the surrounding panels. Test the door’s swing and closing mechanism to ensure it operates smoothly. Finally, install any additional hardware, such as locking mechanisms or soft-close dampers, following the manufacturer’s instructions. Properly installed doors and hardware enhance privacy, security, and overall usability of the cubicle.
Connecting Electrical Components
Begin by identifying the electrical components, such as power outlets, data ports, and cable management systems. Route cables through the pre-installed cable channels or raceways in the cubicle panels. Secure the cables using cable ties or clips to maintain organization and prevent damage. Attach the power kit to the cubicle frame, ensuring it is tightly fastened with the provided hardware. Connect data ports to the network or power sources, following the manufacturer’s guidelines. Test all electrical connections to ensure they are functioning properly. Use a voltage tester to verify power outlets are live before use. Properly connecting electrical components ensures safe and efficient functionality of your Steelcase cubicle, supporting all necessary office equipment and technology.

Advanced Features and Customization

Steelcase cubicles offer advanced customization options, including modular components, ergonomic adjustments, and cable management systems. These features enhance workspace adaptability and user comfort effectively.
Integrating Cable Management Systems
Integrating cable management systems into your Steelcase cubicle enhances organization and reduces clutter. Start by identifying cable pathways, often located in the cubicle’s frame or under the worksurface. Use cable ties or clips provided in the assembly kit to secure wires neatly. For power kits and data ports, ensure they are properly connected and routed through designated slots or channels. This not only improves safety but also maintains a clean, professional appearance. Additionally, consider installing cable trays or raceways for heavier cabling needs, ensuring all components are securely fastened to prevent damage or tripping hazards.
Adjusting and Securing Modular Components
Adjusting and securing modular components is crucial for creating a tailored and functional workspace. Begin by identifying adjustable features such as height settings, armrests, and ergonomic supports. Use the provided tools, like Allen wrenches or adjustment levers, to customize the fit to your needs. Ensure all components, such as shelves or panels, are securely locked into place using clips, brackets, or screws. For chairs, adjust the lumbar support, tilt tension, and arm height to promote proper posture. Double-check that all modular parts align correctly and are tightened firmly to avoid wobbling or instability. This step ensures long-term durability and comfort, making your Steelcase cubicle a personalized and efficient workspace.

Troubleshooting Common Issues
Common issues include loose connections, misaligned parts, or damaged components. Check all fasteners, ensure proper alignment, and replace any damaged items to maintain stability and functionality.
Resolving Alignment and Fitment Problems
Alignment and fitment issues are common during Steelcase cubicle assembly. Start by ensuring the frame is level and all connections are secure. If panels misalign, check for proper orientation and reattach using the correct hardware. For stubborn parts, apply a small amount of lubricant like WD-40 to loosen tight connections. Verify that all components are installed in the correct sequence, as outlined in the instructions. If problems persist, double-check the fitment of junctions and brackets, ensuring they align with pre-drilled holes. Adjustments may require tightening or loosening specific bolts. If issues remain unresolved, consult the troubleshooting section or contact Steelcase support for assistance.
Fixing Loose or Damaged Parts
If parts feel loose during assembly, tighten all bolts and screws firmly. For damaged components, assess the extent of the damage. Minor scratches or dents may not affect functionality, but structural damage requires replacement. Use a rubber mallet to gently tap misaligned parts into place. For stubborn connections, apply a small amount of lubricant like WD-40 to ease movement. Inspect all hardware for wear and replace any stripped screws or bolts. If a part is beyond repair, contact Steelcase customer support for replacements. Regularly check all connections after assembly to ensure long-term stability and safety. Addressing issues promptly prevents further damage and ensures the cubicle remains secure and functional.

Final Inspection and Maintenance
After assembly, inspect all connections for tightness and alignment. Regularly check for loose parts and clean surfaces to maintain functionality and aesthetics.
Ensuring Stability and Safety
After completing the assembly, ensure all bolts and screws are tightly secured to maintain structural integrity. Use wall anchors to prevent tipping and enhance stability, especially for taller components. Verify that the cubicle is level and evenly balanced to avoid wobbling. Check that all panels and walls are firmly attached to the frame, ensuring no gaps or misalignments. Test the weight capacity by applying moderate pressure to various points. Ensure electrical components are safely connected and secured to prevent hazards. Finally, inspect for any loose parts or sharp edges that could pose a risk. Regular inspections and adjustments will help maintain a safe and stable workspace.
Cleaning and Upkeep Tips
Regular cleaning and maintenance are essential to preserve the longevity and appearance of your Steelcase cubicle. Use a soft, dry cloth to wipe down surfaces, removing dust and debris. For tougher stains, dampen the cloth with water, but avoid harsh chemicals or abrasive cleaners that could damage materials. Fabric panels can be vacuumed gently or spot-cleaned with a mild detergent solution. Inspect and tighten any loose connections or screws periodically to ensure stability. Avoid exposure to direct sunlight, which may fade fabrics or warp materials. Organize cables and wires neatly to prevent dust buildup and maintain a clutter-free workspace. Regular upkeep ensures your Steelcase cubicle remains functional, comfortable, and visually appealing for years to come.